Have you ever questioned yourself on how to add support for C/C++ code to your existing Android application?
In this article we are going to take a super simple Android application with Gradle and follow the steps required to make this app work with our C code. At first we are going to show the process on embedding your C source code into the application and secondly we will describe how you would embed directly the compiled libraries (.so files) into the app.
We assume you are familiar with the Android concepts a bit and that you know more or less what is JNI.
The application we are going to use is based on an Empty Activity project template from Android Studio.
In order to make things simpler in case you would like to follow the steps on your own you can find the source code available here. In the master branch you will find the code for embedding directly the .so files in your app while in the branch here you will find the code for adding the source to your Android project.
Your application will have much more things but the exact same principles apply. The structure of your project should be similar to the following tree structure from the demo app we will work with.
├── app
│   ├── app.iml
│   ├── build
│   │       └── [...]
│   ├── build.gradle
│   ├── libs
│   ├── proguard-rules.pro
│   └── src
│       ├── androidTest
│       │   └── [...]
│       ├── main
│       │   ├── AndroidManifest.xml
│       │   ├── java
│       │   │   └── com
│       │   │       └── erev0s
│       │   │           └── jniapp
│       │   │               └── MainActivity.java
│       │   └── res
│       │       ├── [...]
│       └── test
│           └── [...]
├── build.gradle
├── gradle
│   └── [...]
├── gradle.properties
├── gradlew
├── gradlew.bat
├── JNIapp.iml
├── local.properties
└── settings.gradle
Lets assume that we want to transfer a part of the application to be done though JNI in C code. Currently our demo Android app has a floating action button with one funtionality as can be seen in the MainActivity below. When this button is pressed a snackbar appears with the text Lets make this come from JNI.
public class MainActivity extends AppCompatActivity {

    @Override
    protected void onCreate(Bundle savedInstanceState) {
        super.onCreate(savedInstanceState);
        setContentView(R.layout.activity_main);

        // https://www.youtube.com/watch?v=Plr6vUsOMp0
        TextView tv = findViewById(R.id.onlyYou);
        tv.setText("erev0s.com");

        FloatingActionButton fab = findViewById(R.id.fab);
        fab.setOnClickListener(new View.OnClickListener() {
            @Override
            public void onClick(View view) {
                Snackbar.make(view, "Lets make this come from JNI", Snackbar.LENGTH_LONG)
                        .setAction("Action", null).show();
            }
        });
    }
}
Our goal is to invoke a function written in C through JNI that would take the place of the static string Lets make this come from JNI.
Include the C/C++ source code in the App
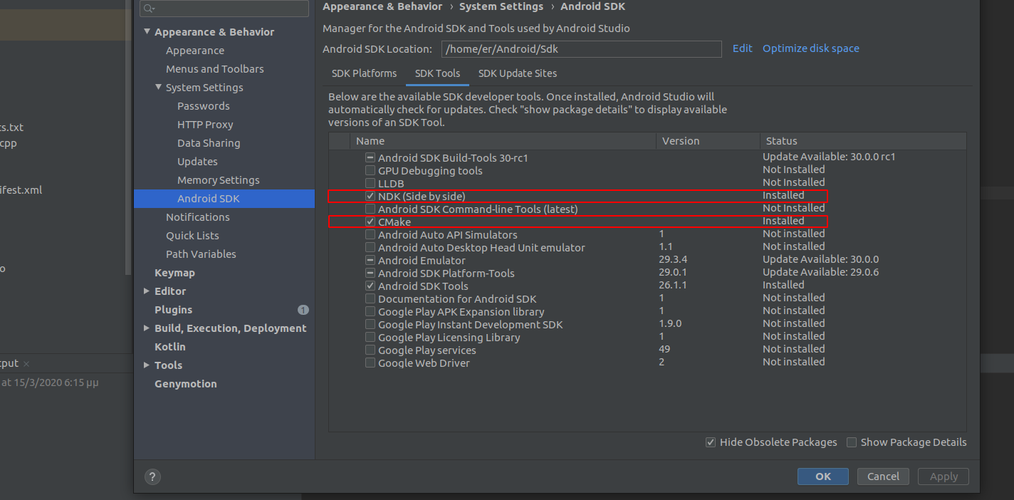
As a next step we have to adjust the application to be able to handle the C code that will be executed. In order to do this two things are required:
- Install NDK
- Install CMake
Android Studio makes it easy to install the above requirements by visiting the SDK Tools tab in Tools/ SDK Manager.
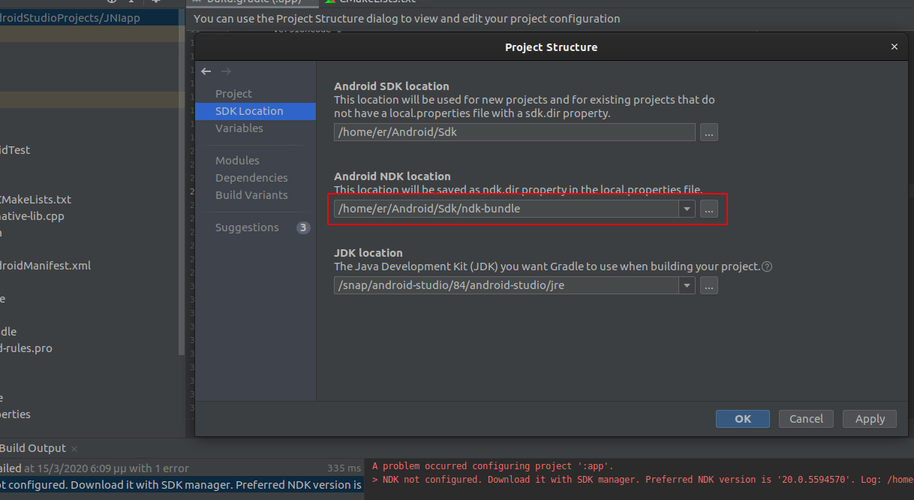
After installing both, it needs to be specified into our project the path of the NDK. This is done by either pressing Ctrl+Alt+Shift+S or visiting File/Project Structure.
After that there are only three basic steps left!
- Create a "makefile"
- Adjust the
build.gradlefile - Add the actual
Ccode
Lets take a closer look to each one of them.
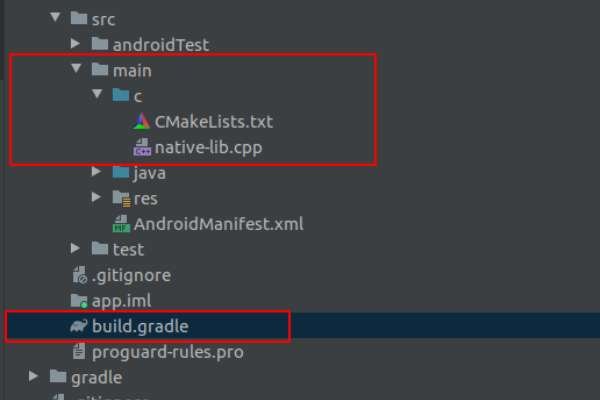
First things first, we need to create a directory named c, located inside app/src/main and populate it with two files. The two files we need to create are the CMakeLists.txt and the native-lib.c.
CMakeLists.txt
The makefile to be used is usually named CMakeLists.txt.
The contents of this file are described below.
Please note that we are showing here the default CMakeLists.txt created by Android Studio due to it provides adequate comments so you can understand what it does in each section.
# For more information about using CMake with Android Studio, read the
# documentation: https://d.android.com/studio/projects/add-native-code.html

# Sets the minimum version of CMake required to build the native library.

cmake_minimum_required(VERSION 3.4.1)

# Creates and names a library, sets it as either STATIC
# or SHARED, and provides the relative paths to its source code.
# You can define multiple libraries, and CMake builds them for you.
# Gradle automatically packages shared libraries with your APK.

add_library( # Sets the name of the library.
             native-lib

             # Sets the library as a shared library.
             SHARED

             # Provides a relative path to your source file(s).
             native-lib.c )

# Searches for a specified prebuilt library and stores the path as a
# variable. Because CMake includes system libraries in the search path by
# default, you only need to specify the name of the public NDK library
# you want to add. CMake verifies that the library exists before
# completing its build.

find_library( # Sets the name of the path variable.
              log-lib

              # Specifies the name of the NDK library that
              # you want CMake to locate.
              log )

# Specifies libraries CMake should link to your target library. You
# can link multiple libraries, such as libraries you define in this
# build script, prebuilt third-party libraries, or system libraries.

target_link_libraries( # Specifies the target library.
                       native-lib

                       # Links the target library to the log library
                       # included in the NDK.
                       ${log-lib} )
Adjust the build.gradle
Only one thing is essential to be added in the build.gradle file of the application. This is the externalNativeBuild that needs to be added in the android section. It defines the path where the CMakeLists.txt is located. If you would like to know more about this you might want to check here.
android {

[...other things here...]

    externalNativeBuild {
        cmake {
            path "src/main/c/CMakeLists.txt"
            version "3.10.2"
        }
    }
}
Adding our C code
It is time to add the actual C code we want to use inside the file native-lib.c . It is a matter of preference how you will structure your code inside the c directory we have created. Keep in mind that if you have multiple files you will need to adjust accordingly the CMakeLists.txt!
In this case we will add a simple function to generate a random integer. Lets see the code first and comment on it later.
#include <jni.h>
#include <stdlib.h>
#include <time.h>


jint Jniint() {
    srand((unsigned int) time(0));
    int intrandom = (rand() % (990 - 101)) + 101;
    return intrandom;
}

JNIEXPORT jint JNICALL
Java_com_erev0s_jniapp_MainActivity_Jniint(JNIEnv *env, jobject this)
{
    return (jint) Jniint();
}
One thing we notice straight away is the use of jint instead of the normal int we would probably expect. The jni.h defines the corresponding primitive types to be used in Java, you can find out more about them here.
- JNIEXPORT – marks the function into the shared lib as exportable so it will be included in the function table, and thus JNI can find it
- JNICALL – combined with JNIEXPORT, it ensures that our methods are available for the JNI framework.
- JNIEnv - the most important component of the JNI space. It acts as a bridge to access the Java objects.
Do notice the structure of the signature that is used to define the use of a method - Java_com_erev0s_jniapp_MainActivity_Jniint. You might question as to why the actual implementation of Jniint is not inside the same location where the signature is. We could obviously do that but the reason behind this is writing a cleaner code. We declare the signature like this and thus we are not committed to have the implementation of Jniint in the same file. This is particularly useful in big applications where we would like to keep things tidy.
We are all set to use the defined method Jniint() into our Android app. We adjust our MainActivity to be like the following:
package com.erev0s.jniapp;
import androidx.appcompat.app.AppCompatActivity;
import android.os.Bundle;
import android.view.View;
import android.widget.TextView;
import com.google.android.material.floatingactionbutton.FloatingActionButton;
import com.google.android.material.snackbar.Snackbar;
public class MainActivity extends AppCompatActivity {
// Used to load the 'native-lib' library on application startup.
static {
System.loadLibrary("native-lib");
}
/**
* A native method that is implemented by the 'native-lib' native library,
* which is packaged with this application.
*/
public native int Jniint();
@Override
protected void onCreate(Bundle savedInstanceState) {
super.onCreate(savedInstanceState);
setContentView(R.layout.activity_main);
// Example of a call to a native method
TextView tv = findViewById(R.id.onlyYou);
tv.setText("erev0s.com");
FloatingActionButton fab = findViewById(R.id.fab);
fab.setOnClickListener(new View.OnClickListener() {
@Override
public void onClick(View view) {
Snackbar.make(view, "Our magic JNI number is :" + String.valueOf(Jniint()) + " !", Snackbar.LENGTH_LONG)
.setAction("Action", null).show();
}
});
}
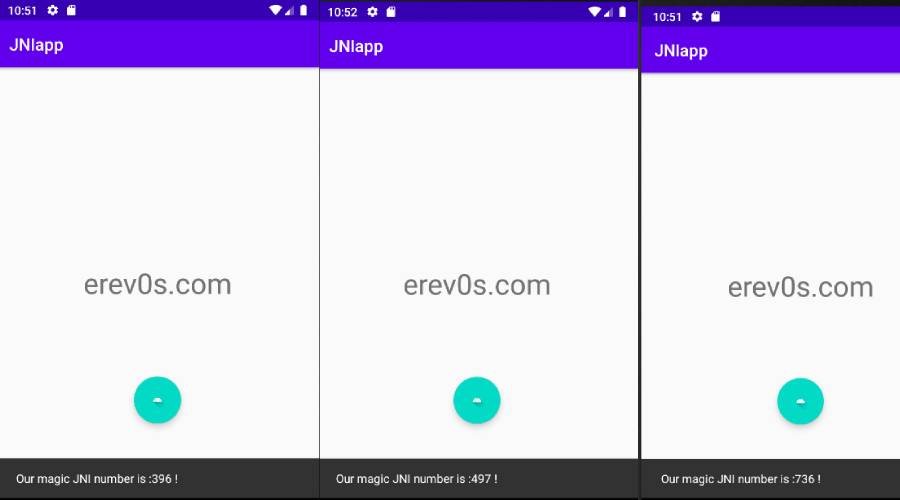
}Once we build the application it runs and upon clicking the button it generates a new random number every time coming from the C code we implemented.
Include already compiled .so files in the App
In this scenario we assume that somehow we have the compiled files (.so) and we want to use them directly in our app. This is totally possible and relatively easy to do. Obviously though we have to already know the names of the methods we want to use.
The first thing to do is create (if it does not already exist) a directory named libs inside our app. The name libs is not mandatory, you can actually use any name you like, we picked that as it is kind of the default name to use.
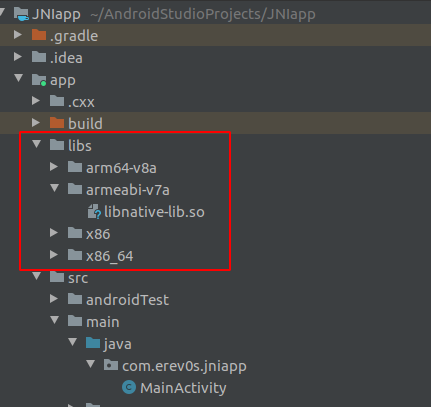
Inside the directory libs, as you can see in the picture above, we have placed the different versions (for different architectures) of the already compiled .so files we have. As you might guess these .so files are the compiled version of the C code we made earlier.
The next and final step is to adjust the build.gradle file of the app to know where to search for the libraries. In order to do that we add the following into the android part of the build.gradle file.
android {

[..other things here...]

   sourceSets {
        main {
            jniLibs.srcDirs = ['libs'] // where libs is the name of the directory!
        }
    }
}
Everything is ready now. Using the method Jniint() in the MainActivity as described above will work even though the source code is missing from our app.
Conclusion
In this article it is demonstrated how you can include C code in an existing Android App with Gradle using the Java Native Interface(JNI). We saw that you can include either the source code or the already compiled version of the code.
If you have any question or something to suggest, please do use the contact form to let me know!