Although the concept of SSH port forwarding might be straight forward to some, it has its dark spots for others. In this article we will try to explain in detail local, remote and dynamic port forwarding and also see examples and tools that can be used in each case for both Windows and Linux.
As SSH tunneling in general we describe a method in which an SSH connection is used to transfer arbitrary data over the encrypted ssh protocol. The basic usage of SSH tunneling in pen-testing/hacking is to be able to "speak" to machines that normally we may not be able to, or to expose services that were not supposed to be exposed. If you would like to know more about it in general you can find a nicely written page here.
In the following sections you will find the three types of forwarding explained and in order to put things into perspective, which might be helpful in fully comprehending the concepts, we will use an example scenario. In this scenario, we as the normal user, from our humble laptop (1.1.1.1/24) we will try to reach out to a remote host (2.2.2.2/24) in a different network.
Overview
Local Port Forwarding
What is it: Forwarding a single port from our machine to a remote machine.
One picture is 1000 words so here it is.
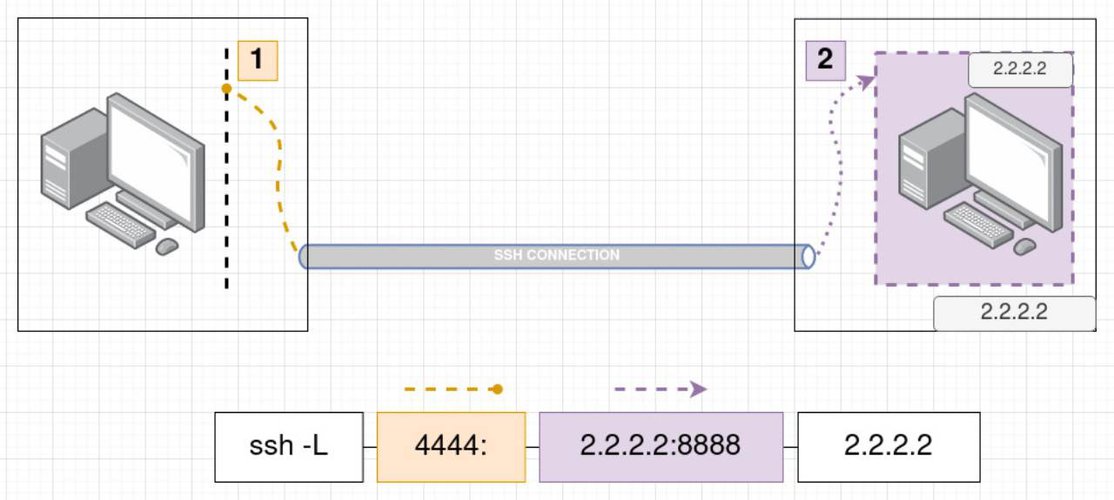
What we are doing in this case is "pretending" to have in a our local port 4444 what the remote host has in his port 8888. This way if for example the remote host us running a web server in the port 8888 we will be able to see it locally by visiting in our browser the http://127.0.0.1:4444.
As shown also in the image above the full ssh command to accomplish that, is the following ssh -L 4444:2.2.2.2:8888 2.2.2.2. If you wish to define the user to connect as, in the remote server, simply add it like this [email protected] so the full command will be ssh -L 4444:2.2.2.2:8888 [email protected]. Notice the blocks in the picture, the first one states simply that we use ssh and the flag -L is used to specify that we want local port forwarding. The second is which local port we want to forward, the third block indicates which remote host we want our local port to be forwarded to and to which port. Finally, the fourth block simply states the remote host where the ssh connection will happen.
A very important thing to note here, is the following:
In the picture above, the remote host with the remote port defined in the third block is not necessarily the same as the remote host in the fourth block!
To fully understand this lets see another picture.
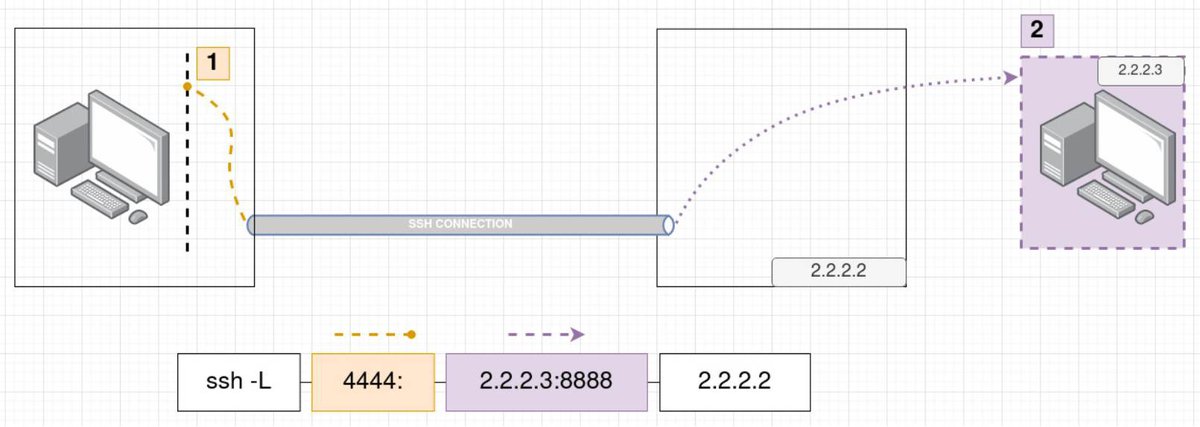
As you can see in this case the command we run has slightly changed. What changed is that we no longer port forward to the same machine as the machine we ssh to. We use the machine 2.2.2.2 to forward any traffic sent to our local port 4444 to the remote host 2.2.2.3 and port 8888. Now, imagine that you cannot see at all the host 2.2.2.3 if you try to reach it from your laptop directly and you desperately want to access its port 8888! Since the host 2.2.2.2 is on the same network as the host 2.2.2.3 it can see it fine.
When is this useful? This is a perfect scenario for local port forwarding where we take advantage of our SSH access to the host 2.2.2.2 in order to reach the port 8888 from the host 2.2.2.3 which originally we could not see.
Remote Port Forwarding
What is it: Forwarding a single port from a remote machine to a port in our local machine.
In this case if someone tries to connect to the forwarded port on the remote host, then she/he will actually contact the local port on our machine. The remote host is "pretending" to have in the forwarded port what we serve in our local port in our machine. Lets see again a picture that will help to better understand it.
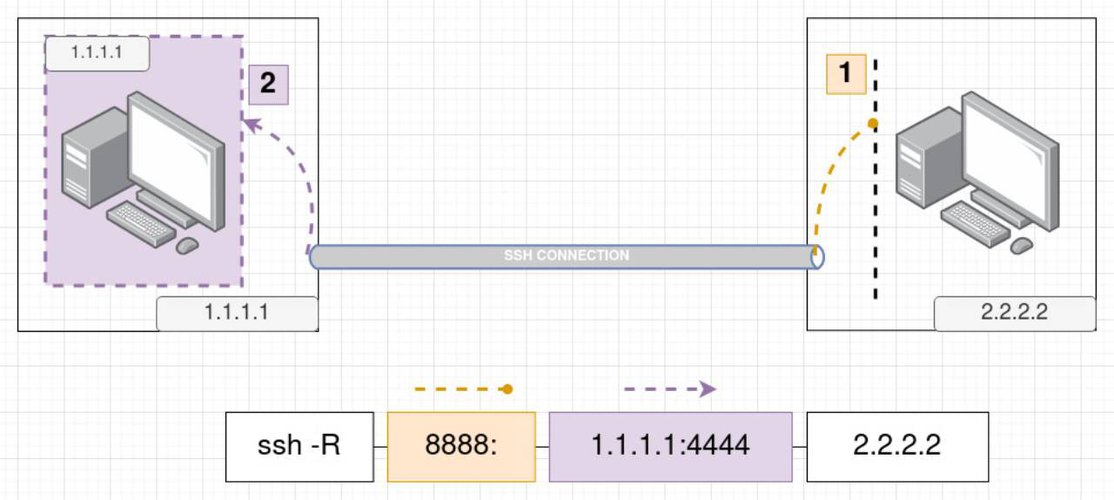
So as we can see, if we visit now the remote host in port 8888 we will get a response from the port 4444 from our local machine 1.1.1.1. To put it as an example, if we run on our laptop on host 1.1.1.1 a web server on port 4444, someone visiting the remote host http://2.2.2.2:8888 will be able to see the content we serve from our laptop!
The command as shown also in the picture is this ssh -R 8888:1.1.1.1:4444 2.2.2.2. The -R flag is required to be specified to indicate the remote port forwarding. Keep in mind that if you would like to specify the user to connect as, in the remote server you can do it like this ssh -R 8888:1.1.1.1:4444 [email protected].
Similarly to the local port forwarding the third block does not necessarily have to be the IP of our machine. The following picture explains it better:
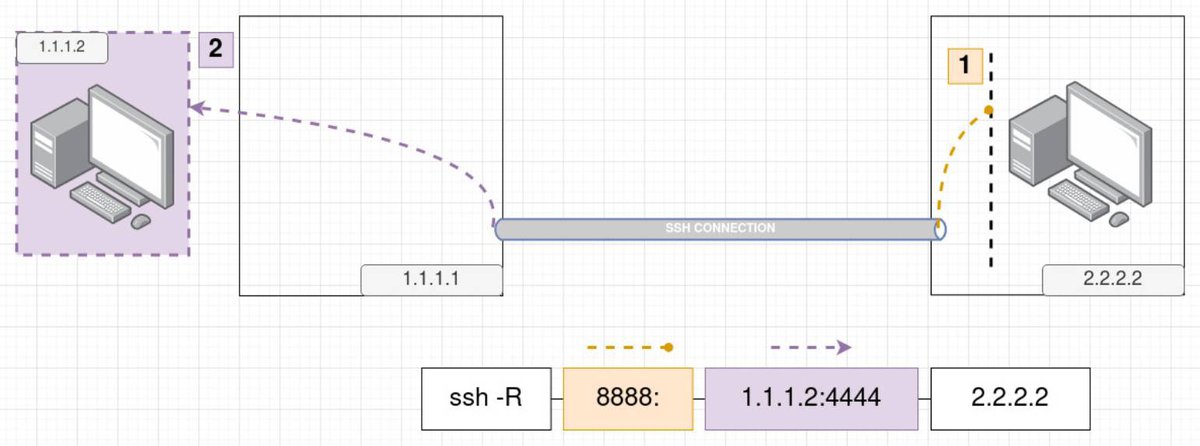
In this case we forward what the remote host receives in its port 8888 towards the port 4444 of the machine 1.1.1.2 which is in our local network. Ok, you may be asking yourself now, why would that be of any use? Lets see an example that happens quite often while pentesting in a network.
When is this useful? Imagine that you are attacking a remote web server and you are lucky enough that you see there is a web-shell already there waiting for you. You get access to the server and while searching around you realize that there is another machine in the same network as this web-server that you did not find previously while scanning from your local machine. Interesting, but what kind of port forwarding will you use now? You dont have ssh access to the web-server you only have a shell there! Yeap, the answer is, that you will use a remote port forwarding. You will need to ssh from the web-server back to your local machine and remote port forward a port from the other machine which is in the same network as the web-server. In the image above then, the web-server in this case is the machine 1.1.1.1, our local machine is the machine 2.2.2.2 and the interesting machine we want to see is the 1.1.1.2.
Dynamic Port Forwarding
OK but what if we want to access multiple ports and it will be a huge waste of time or even impossible to do it manually. For this case there is the Dynamic Port Forwarding(DPF).
Before seeing more details about DPF, we need to first get to know what the SOCKS protocol is, as it is the key to all this magic. Getting into details about how SOCKS works is outside of the scope of this article but you can find a plethora of information just by googling for it. The basic things to note are that SOCKS operates on the Layer 5 of the OSI model which means that you can not tunnel anything operating at level below 5 (like ping, arp etc) and the fact that SOCKS has two versions in use these days, the socks4 and the socks5. The differences between the two are that socks5 supports authentication, ipv6 and udp while socks4 not!
Lets see an image again that will help clear things out.
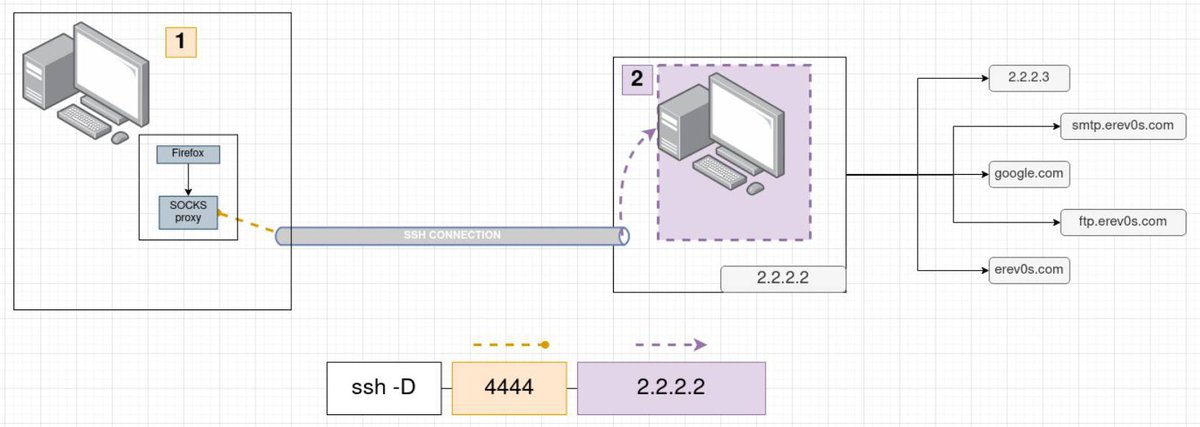
It is important to understand that in order to use DPF the application you want to use must support SOCKS proxying. In the image above we have as an example Firefox which is a browser that supports SOCKS proxy. After we have configured Firefox to send everything to port 4444 where SSH has already setup a SOCKS server, our data are traveling through SSH to the remote host and from there to the exact destination(Host and Port) that we are trying to reach. Firefox here is merely an example, other protocols besides HTTP(s) are available through SOCKS proxying like SMTP, FTP etc.
When is this useful? You might use this as a sort of alternative to a VPN (although it has its downsides in comparison to a VPN). In pentesting a use case that is met often is when we are trying to do an Nmap scan of a network or scan another host within a network that is not accessible from the Internet. In this case, assuming that you have compromised a host, you use that compromised machine to explore further. Again you should pay attention that SOCKS works on layer 5 as we mentioned so don't expect things like ping, arp or the half-open reset that SYN scan does in Nmap, to work!
There are different tools to help you out when DPF is in play. The most common one is Proxychains which is available for Linux and Mac but also for Windows!
It is beyond the scope of this article to show details on how to setup Proxychains but the idea is relatively simple. You create your SSH dynamic port forwarding to a port you like, then you add this port to the proxychains.conf and thats it, you can run use it. The following snippet shows an example of running nmap through proxychains to scan erev0s.com.
➜  ~ proxychains nmap -sT -p21,22,80 erev0s.com
[proxychains] config file found: /etc/proxychains4.conf
[proxychains] preloading /usr/lib/x86_64-linux-gnu/libproxychains.so.4
[proxychains] DLL init: proxychains-ng 4.14
Starting Nmap 7.80 ( https://nmap.org ) at 2020-10-17 16:41 CEST
[proxychains] Strict chain  ...  127.0.0.1:9051  ...  erev0s.com:80  ...  OK
[proxychains] Strict chain  ...  127.0.0.1:9051  ...  erev0s.com:80  ...  OK
[proxychains] Strict chain  ...  127.0.0.1:9051  ...  erev0s.com:21  ...  OK
[proxychains] Strict chain  ...  127.0.0.1:9051  ...  erev0s.com:22 <--socket error or timeout!
Nmap scan report for erev0s.com (224.0.0.1)
Host is up (0.074s latency).
rDNS record for 224.0.0.1: all-systems.mcast.net

PORT   STATE  SERVICE
21/tcp open   ftp
22/tcp closed ssh
80/tcp open   http

Nmap done: 1 IP address (1 host up) scanned in 15.24 seconds
Examples and Tools
Similar to the proxychains tool shown above, which is very useful with the Dynamic port forwarding, we are going to see in this section examples and more interesting tools! We are going to start with some details that can come in handy on how to setup our port forward in different situations.
A scenario met often in pentesting is the following. We are attacking a network from our laptop(1.1.1.1) and we already have ssh keys to access a machine in the other network (2.2.2.2). This machine is the only machine we can see in that network from outside. After scanning, we see another machine in that network (2.2.2.3) and we find credentials to access that machine as well using SSH. Though, since we cannot see it directly we should somehow SSH to the machine 2.2.2.3 through the machine 2.2.2.2 which we can see directly. The following one liner command shows how to achieve that:
ssh -A -t -l erev0s 2.2.2.2 ssh -A -t -l erev0s 2.2.2.3

# From the man pages of ssh
-A      Enables forwarding of connections from an authentication agent such as ssh-agent(1).  This
             can also be specified on a per-host basis in a configuration file.
-l login_name
             Specifies the user to log in as on the remote machine.
-t      Force pseudo-terminal allocation.  This can be used to execute arbitrary screen-based pro‐
             grams on a remote machine, which can be very useful, e.g. when implementing menu services.
             Multiple -t options force tty allocation, even if ssh has no local tty.
Ok now we can SSH to 2.2.2.3 but how can we port forward to it? What we basically will do is, local port forward to 2.2.2.2 from our machine (1.1.1.1) and then again local port forward to 2.2.2.3 from 2.2.2.2. The command to achieve this, is the following:
ssh -A -t -l er 192.168.178.28 -L 8888:localhost:8888 ssh -A -t -l er 192.168.178.29 -L 8888:localhost:8888) in the explanation of the flag -A
This one liner is nice and pretty straight forward but if you open the man page of ssh (man ssh) in the explanation of the flag -A you will see that there is a word of caution about it and a suggestion to use the flag -J. Before moving forward on what the flag -J does we should note that only the newer versions of SSH have it and especially when pentesting rather old server we will not find it, so lets first take a look to another one liner.
This time we will use the ProxyCommand option. The full SSH command is shown below:
ssh -o 'ProxyCommand=ssh -W %h:%p -q [email protected]' [email protected]

# From the man pages
-W host:port
             Requests that standard input and output on the client be forwarded to host on port over the secure channel.  Implies -N, -T,
             ExitOnForwardFailure and ClearAllForwardings, though these can be overridden in the configuration file or using -o command line options.

-q      Quiet mode.  Causes most warning and diagnostic messages to be suppressed.
Again as before the concept is the same, before establishing the connection to 2.2.2.3 run the SSH command to connect to 2.2.2.2. The flags from the man pages are pretty self-explanatory.
Finally the suggested way to do this is through the -J flag as we mentioned earlier. This is because the SSH handles internally everything and it can chain multiple jump hosts this way. This simplifies a lot the structure of the command used to connect to a machine and therefore the command to port forward. The next snippet shows how simple and clean is the command to port forward to 2.2.2.3.
ssh -J [email protected] [email protected] -L 8888:localhost:8888Explaining how to jumphost from another machine is essential in understanding how to port forward. As we saw in the first example it was required to specify the -L flag twice in order to port forward properly and the same applies for the second case with the ProxyCommand while when using the -J flag we only needed to specify the port forwarding rule once!
Finally, one option that you can use in all cases when you want to keep a connection active even if you are idle is the ServerAliveInterval. It will wait N seconds before the client sends a null packet to the server in order to keep the connection alive. you can use it by adding it like this : -o ServerAliveInterval=60.
Other Tools
How can we do all these in Windows though? Well, you can install SSH or you can use netsh. What about if I am doing a pentest and I have access as a low level user and there is no SSH available?
One of the most known tools for this case is plink. Plink is a command line interface to the PuTTY back ends and it allows us to use SSH in a similar way that we would do in a linux machine.
Imagine now that we have a low level shell access to a Windows machine (2.2.2.2) and there is a service running in that machine on listening to localhost on port 8888. Since we do not have direct SSH access from our laptop (1.1.1.1) we can not use local port forwarding. What we could do though, is transfer plink to the machine 2.2.2.2 given that we have a shell access and from there initiate an SSH connection back to our machine. If we can have an SSH back to our machine then we can also have a remote port forwarding tunneling! This way we can forward the port 8888 that listens on the localhost back to our machine on port 4444 for example.
The command to execute is like this plink.exe -x -a -T -C -noagent -ssh -pw "yourSSHpassword" -R 4444:2.2.2.2:8888 1.1.1.1. You can check what each flag is doing here.
Another very interesting and known tool is sshuttle. The magic of sshuttle is that it is very easy to setup and it works sort of like a VPN. This means that once you set it up (requires root access on your machine) then it automatically handles TCP and UDP requests and tunnels them through the SSH active session. Note, that you only need root on your machine, the only thing required on the machine you are connecting to, is to have python installed as it will automatically transfer and execute itself there. You can read more about how it works here. One downside someone might say about it, is that it does not support Windows.
An example command you would run to have your traffic tunneled using sshuttle is the following: sshuttle --dns -r username@sshserver 0/0, where the 0/0 is shortcut for 0.0.0.0/0.
Finally, a tool that everyone should know about as with it you can setup any kind of port forwarding you like! SSF or secure socket funneling, it is standalone and it has support for multiple platforms including Windows! Again as sshuttle you do not need root/admin rights to execute it on the machine you are trying to connect to which it makes it perfect for pentesting purposes. To explore it further you can visit its documentation page here.
Conclusion
In this article we saw the different kinds of port forwarding using SSH along with details pictures. If you are having trouble figuring out each time which forwarding you need then simply set up a VM in your environment and practice following the pictures above along with your own sketches. It should not take you long before you have a clear understanding of the concepts and which one is suitable for every case.
As always feel free to contact me for anything you might want to add or comment. Keep learning !