We are going to talk over four basic things to improve your SEO ranking on a wagtail CMS. The latest tweaking for SEO to erev0s.com lead to the creation of this article. Namely the points we will cover are:
- Page title and meta description and other meta tags
- Creating a robots.txt.
- Creating a custom 404 page.
- Creating a sitemap.
Please keep in mind that this article will emphasize on how to create efficiently the mentioned topics and not on the content itself. For example we will show how you can get the title of a page but what the title would be and the rules to follow for a good title is another story for another time.
1-Page Title and Meta Description and other meta tags
We assume that you already know your way around the template syntax of Wagtail/Django. It is pretty simple to add a block in your base html template, so you can customize in each page what you want to show. But changing manualy each time the content of the block is not scalable. How about taking advantage of Wagtails inbuilt promote tab?
As we can see from the official documentation here, Wagtail provides two very fundamental fields that we define from the Wagtail`s admin backend.

The Page title and the Search description are very convenient as we can customize them individually for every page without the necessity to access any template file. But they are not the only fields we need to adjust for a complete result. If we care about our SEO performance there are other fields we should take under consideration.
We are talking about the open graph fields. This allows search engines and crawlers of websites and apps like facebook and skype to fetch exactly what they are looking for. The fields we are going to demonstrate and that we are actually using in erev0s.com are the following, og:title, og:description, og:image and og:url. You can see the following image and you can verify it by looking the source code of the page using Ctrl+u.

Lets see now how to do this on our Wagtail/Django template.
<meta name="description" content="{% block meta_description %}erev0s page description{% endblock %}"/>
<link rel="shortcut icon" href="{% static 'erev0s_favicon.png' %}"/>
<meta property="og:title" content="{% if self.seo_title %}{{ self.seo_title }}{% else %}{{ self.title }}{% endif %}- erev0s.com">
<meta property="og:description" content="{% if self.search_description %}{{ self.search_description }}{% else %}erev0s blog for cyber security and more{% endif %}">
<meta property="og:image" content="https://erev0s.com/media/images/erev0slogo.original.jpg">
<meta property="og:url" content="{{ page.full_url }}">

<title>
    {% block title %}{% if self.seo_title %}{{ self.seo_title }}{% else %}{{ self.title }}{% endif %}{% endblock %}- erev0s.com
</title>
With the use of the two variables we dynamically access the page title and description from the promote tab. For the rest of the meta tags you will need to adjust it accordingly to your purposes. Do keep in mind that you may have to dynamically assign some meta tags like the og:image depending on the page the template is displaying!
TIP: Be careful on how many spaces and newlines you will leave in your template in the meta tags as is will be visible in the output!
2-Creating a robots.txt
First of lets clarify that we will talk only about robots.txt and not meta robots or x-robots.
robots.txt is a file that is usually located on the root of the website and its purpose is to instruct web robots (search engine robots) how they should crawl the website. The importance of having a robots.txt in your website is beyond this article but you can find more here. Further if you want to know more about the best practices in SEO regarding the robots.txt you can check this source.
So, how can I include a robots.txt in Wagtail or Django?
We are going to mention two methods. The difference being having access to the web server or not!
Having access to the web server(Nginx/Apache).
The fact that we have access to the web server Nginx/Apache allows us to configure it in such a way to serve our file upon request. What we can do is include our robots.txt in the static content of our application. When we run the collectstatic directive in order to collect our static files into a single location, so they can be served in production, the robots.txt file will be included as well. Therefore we can now specify our web server to serve the file directly when requested.
An example configuration for an Nginx and an Apache web server is shown below
# Nginx configuration
location  /robots.txt {
    alias  /path/to/static/robots.txt;
}


# Apache configuration
Alias /robots.txt /path/to/static/robots.txt
NOT having access to the web server.
In the event where we do not have access to alter the configuration of the web server, then a smart solution is to adjust the urls.py of our application to serve a custom http response when visiting the /robots.txt location. An example is shown below
# In your urls.py
from django.conf.urls import url
from django.http import HttpResponse

urlpatterns = [
    url(r'^robots.txt', lambda x: HttpResponse("User-Agent: *\n", content_type="text/plain"), name="robotstxt_file"),
    #.... the rest of your project urls
]
This solution is short and smart though it may not be the best solution if you have a lot of lines in the robots.txt file you want to use. In that scenario it would be preferable to create a proper view to serve exactly the content you want.
3-Creating a custom 404 page
In order to create a custom 404 page for our Wagtail CMS, Django has already made this really easy for us. As we see in the official documentation as well (here), we need to define a handler in the URLconf that would specify the view to be used. It is essential to add the handler to the urls.py file as if we include it some place else it will not work. The code below provides an example on how you should define the handler404 function on your views.py and also how to declare the handler in the urls.py.
# In your views.py
def handler404(request, exception, template_name="404.html"):
    response = render_to_response("404.html")
    response.status_code = 404
    return response

# In your urls.py
handler404 = 'your-app.views.handler404'
Then you are free to customize your 404.html template any way you see fit. A nice article to help you get started on what you should be careful about your 404 custom page is this one.
4-Creating a sitemap
Finally to create a sitemap which helps search engines crawl our website we need to follow some very simple steps.
The first step is to include the django.contrib.sitemaps into the INSTALLED_APPS in your settings. So you will have the following:
INSTALLED_APPS = [
    ...

    "django.contrib.sitemaps",
]
Next and final thing is to include the path where the sitemap will be into our urls.py. The only thing to keep in mind is to leave the Wagtail's page serving mechanism to be the last line, so we need to add our sitemap url above that! We can see an example below:
from wagtail.contrib.sitemaps.views import sitemap
urlpatterns = [
...
url('^sitemap\.xml$', sitemap),
...
# Ensure that the 'sitemap' line appears above the default Wagtail page serving route
url(r'', include(wagtail_urls)),
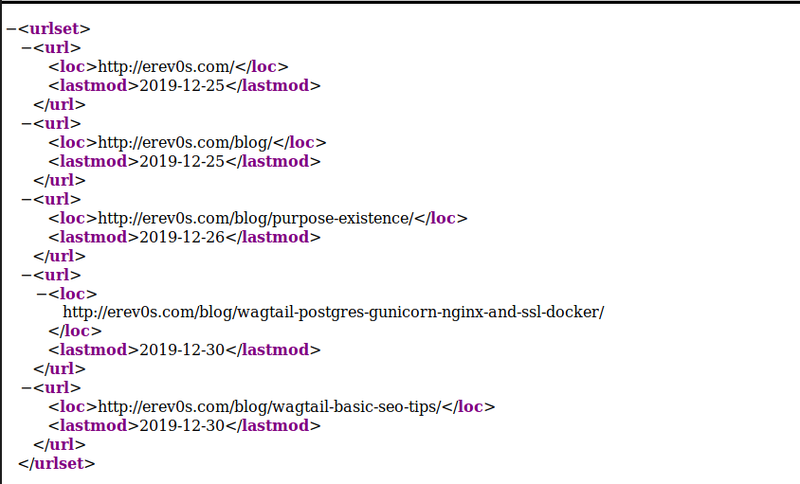
]Now you should be able to visit yourdomain.com/sitemap.xml and have a result similar to the following which is from the sitemap of erev0s.com.
Conclusion
This article provided some basic tips on how to take advantage of your Wagtail CMS in order to improve your SEO ranking. You will need to read quite some more articles regarding what content you should chose to include in your websites but I hope the ways shown here on how to structure these four things could prove somewhat helpful. Good luck on your search to raise on the search engine rankings and of course if you have anything to share feel free to send me a message!