In a previous post we took an example Android application and we assumed that we would like to replace part of it with an implementation in C/C++. In this post we are going to use that application and we will try to hook the Jniint function we created as part of the C code.
If you are looking for frida code snippets you might be interested in this post!
This tutorial is noob friendly and its purpose is to introduce people in hooking methods with Frida and more specifically native methods. We are going to present the entire process from having just the apk and move on step by step. If you would like to download the apk of the application made in our previous post, you can find it here.
We have Java methods and C functions to deal with in this tutorial, I am going to use the terms interchangeably as they basically mean the same thing!
The first step is to investigate if the apk has any shared libraries that are being loaded. A simple way to verify this is by simply extracting the contents of the apk. Dont forget that the apk is only a wrapper for the actual application and therefore it is possible to extract the contents similar to unzipping a zipped file. Pick your favorite unzipping program and unzip the apk.
The structure of the apk after extraction should be similar to the following tree
├── AndroidManifest.xml
├── classes2.dex
├── classes.dex
├── lib
│   ├── arm64-v8a
│   │   └── libnative-lib.so
│   ├── armeabi-v7a
│   │   └── libnative-lib.so
│   ├── x86
│   │   └── libnative-lib.so
│   └── x86_64
│       └── libnative-lib.so
├── [...more here...]
Inside the lib directory we see the compiled versions of the library of the different architectures. Lets the one fitting our device, in my case x86 and step inside. We need to analyze this shared object to see the functions it includes. We can easily do that with the following command nm --demangle --dynamic libnative-lib.so. The results are shown below:
$ nm --demangle --dynamic libnative-lib.so
00002000 A __bss_start
         U __cxa_atexit
         U __cxa_finalize
00002000 A _edata
00002000 A _end
00000630 T Java_com_erev0s_jniapp_MainActivity_Jniint
000005d0 T Jniint
         U rand
         U srand
         U __stack_chk_fail
         U time
The first things to get our attention is the present of the two functions, namely Java_com_erev0s_jniapp_MainActivity_Jniint and the Jniint. In case you would like to know the story of why there are two functions there you might want to check this section in our previous post. Our goal would be to alter the flow of execution of the apk in order the Jniint to be returning a value defined by us.
There are two ways to approach this:
- We hook on the Java layer, meaning that we intercept the Java calls to the JNI and therefore we do not have to deal at all with the C code.
- We dive to the implementation of the Jniint in C and we make our adjustments there.
Usually it is easier to do the first, but there are times where the second can prove to be handy. It all depends on what the application is doing and what you are trying to achieve. We are going to see both methods and comment on the steps.
Setting up our testing Environment
For the purposes of this tutorial but also in my general security tests in Android I like to use Genymotion. It is a super nice emulator, very light-weight and you can also integrate it in your Android Studio. The important thing in the device/emulator you are going to pick as your testing environment is to have root access. Well it is not mandatory to have root in order to perform the hooking(there is an alternative) but it is the way we are going to follow in this post. If you use Genymotion you are going to have root access in the emulator be default.
Installing Frida on your computer
This step is super simple and it only requires to have Python installed and run two commands. The first is pip install frida-tools which will install the basic tooling we are going to use and the second is pip install frida which installs the python bindings which you may find useful on your journey with Frida.
Run the frida-server on the device
First lets download the latest version of the frida-server, which can be found here. Just look for frida-server and pick the android architecture of your device. For Genymotion we are downloading x86. After downloading simply unzip and rename the output to something easy to remember, like frida-server. Now all we have to do is push the file into the device and run it. In order to move the file to the device we need the help of adb. In case you don't have adb in your path already you can download it from here and extract it and either run everything from inside the extracted folder so you will have direct access to adb or you can add it to your path. You can find some instructions here on how to do that.
We assume that you have a working adb and that you have connected your device to your laptop or you have fired up your emulator. The command to run is adb push path/to/your/frida-server /tmp. This would move the file frida-server from your computer into the device in the path /tmp.
Final step to run the frida-server from within the device. To do that we run adb shell to acquire a shell in the device and we navigate to /tmp. Then chmod +x frida-server to make the file executable and as a last step ./frida-server. Do leave that terminal open as it is.
To verify that everything works properly open another terminal and type frida-ps -U. If you get a long list of processes then you are good to go, otherwise please read again this section and follow the steps closely.
Also do not forget to install the apk you have dowloaded or built, if you followed the previous post, to the device. There are several ways this can be done, one of them is using adb by running adb install nameOfApk.apk.
Hooking with Frida using the Java api
We know the name of the method we want to hook, Jniint and now we are going to see how. Please take a look also at the Java api of Frida here, as we are going to use it. It might help you understand better what we are doing.
First things first, lets start the app inside the device simply by visiting the appropriate icon. If you click the button you should be getting different numbers popping up similar to how it is shown here.
We are going now to create a javascript file which is going to be used by Frida to hook the function we want (Jniint). The contents of that file are the following:
Java.perform(function () {
  // we create a javascript wrapper for MainActivity
  var Activity = Java.use('com.erev0s.jniapp.MainActivity');
  // replace the Jniint implementation
  Activity.Jniint.implementation = function () {
    // console.log is used to report information back to us
    console.log("Inside Jniint now...");
    // return this number of our choice
    return 80085
  };
});
The code is relatively straight forward to understand, we first create a wrapper for MainActivity Class and then replace the Jniint implementation which is a method inside the MainActivity class. Save that file as myhook.js. While having the app open in the device we need to open a terminal at the same location where we have the javascript file.
The command we use is : frida -U -l myhook.js com.erev0s.jniapp
The -U flag states to frida that we use a usb device, the -l the javascript file to use and last is the app to find. NOTE that this command requires the application to be already running on the device as it will not spawn it automatically. If you would like to spawn the app automatically you can use the command frida -U -l hookNative.js -f com.erev0s.jniapp --no-pause. The flag -f will spawn the app you specify and the --no-pause will start the main thread of the app after the startup.
No matter which command you use the result should be the same, you will end up with a screen similar to the following:
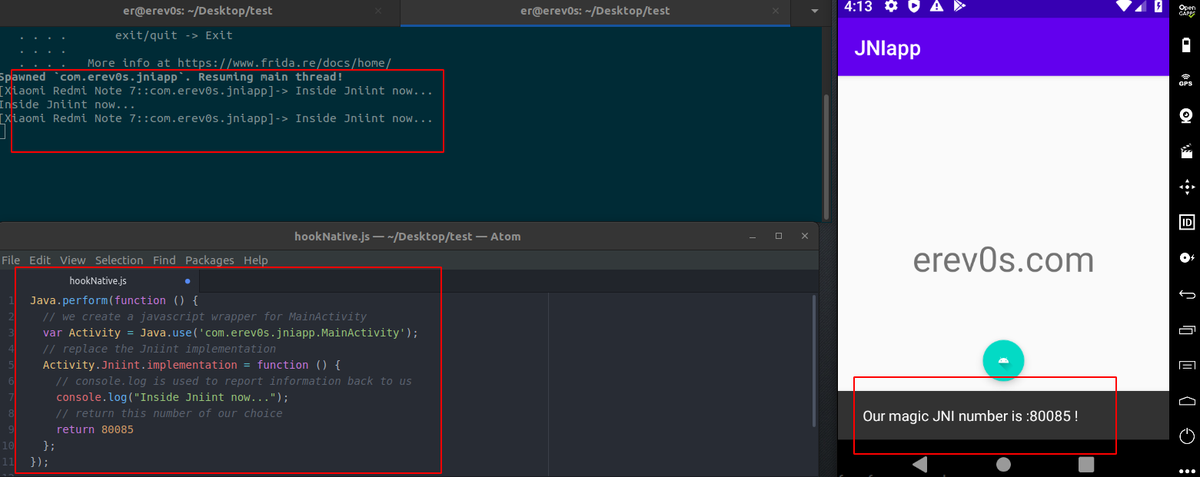
As you can see the result after pressing the button has changed to the defined value we have in our javascript code. Thats it! We have successfully altered the implementation of Jniint using the Java api of Frida.
Hook with Frida directly the Native C implementation!
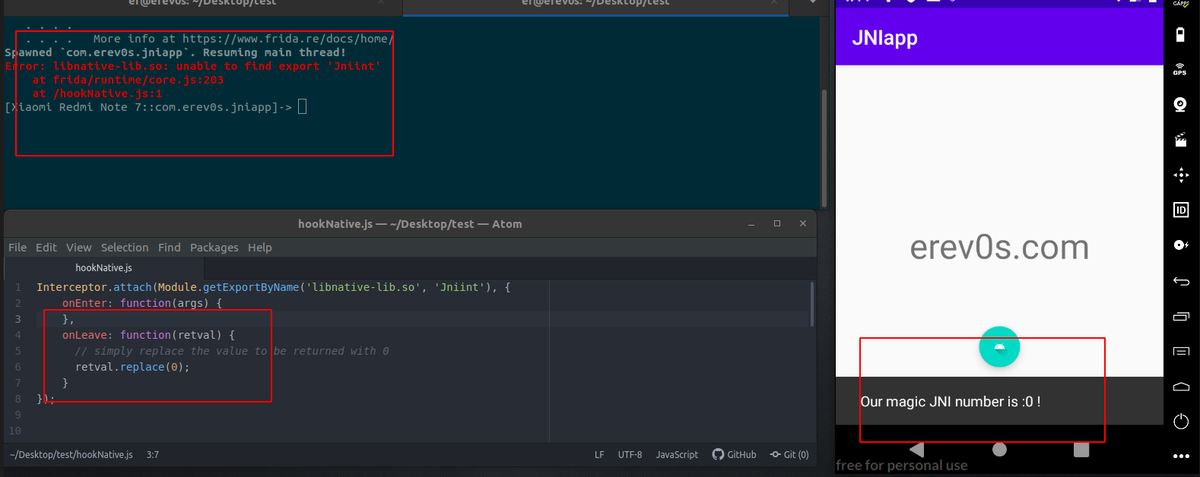
This method is particularly useful in cases where we need to mess with a function in C/C++ and simply altering the returned result is not enough. Such a case would be an encrypt function which would have some special argument(perhaps the key) that we want to find out. We follow the exact same setup as before, the only thing changing is the content of our javascript file myhook.js. The content would become:
Interceptor.attach(Module.getExportByName('libnative-lib.so', 'Jniint'), {
    onEnter: function(args) {
    },
    onLeave: function(retval) {
      // simply replace the value to be returned with 0
      retval.replace(0);
    }
});
The api we are using now is this one, and it automatically searches for the Jniint function within the libnative-lib.so which is the name of the library in the app as we saw earlier when we extracted the files from the apk. The retval.replace(0) is called to replace the returning value.
Upon firing Frida in this case in the same way as before, you will notice an error! No worries this is expected, you see we are trying to hook Jniint but since the button is not pressed yet the function has not been loaded! So frida notifies us that it could not find the export 'Jniint'. Press the button once, now Jniint has been called and therefore the export should be there, the only thing we should do is save our javascript once again so frida will automatically reload it and now if we press the button again we should get the following:
Conclusion
In this post we saw two ways step by step on how we can hook a native method and alter its returned valued. We explained how someone can setup her/his environment and install all the necessary tools to work. If you would like to invest more time on frida make sure you take a look at the official page of the API here, as you will find references for almost everything you will need. An advise would be to take small steps as things can get a bit complicated too quickly when messing with advanced applications. I hope you enjoyed the post and actually learned something. For any question or comment please do not hesitate to contact me and I will try to answer.